navigation bar

Photobucket Photobucket Photobucket Photobucket Photobucket Photobucket Photobucket

Monday, December 24, 2012

Easy Peasy Fudge


Yesterday I shared my easy chocolate peanut butter nut cups recipe. Today I will share an easy fudge recipe with you! Believe me, if I can make this you can too.  Let's get started.

Here is what you will need:


Easy Peasy Fudge
3 cups sugar
1 and 1/2 sticks of butter
16 oz of semi sweet chocolate
1 7oz jar of marshmallow cream 
1 can (5oz) evaporated milk
1 tsp vanilla
nuts if you like

The first thing you need to do is line your dish with foil

In a medium sauce pan bring your sugar, butter and milk to a rolling boil and stir it constantly.  Once it starts to boil set your timer for 4 min and continue boiling and stirring.

Now that you have boiled everything and stirred it constantly for 4min (and I know your arm is about to fall off!)  remove it from the heat and add your chocolate and marshmallow cream.  Stir until everything is all melted.  Now add your vanilla.  You would also add your nuts at this time if you like.  I personally do not like nuts in my fudge.

 Now pour it into your pan and let it set up.  Just a tip, I usually cut mine before they are completely set.  It makes for easier cutting. 
 
YUM YUM!!! Enjoy!

Remember to save some for yourself because this is what the plate will look like once your family and friends get a hold of these babies!

Pin It

Sunday, December 23, 2012

Chocolate Peanut Butter Nut Cups


So, it's that time of year again and I am in the kitchen making my favorite neighbor gifts.  Why is it my FAVORITE neighbor gift you ask???  Well it is because these little things are sooooooo yummy and not only that they only take about 5 minutes to make!  As my gift to you, I am going to share this awesome little treasure.  Here is what you need!

These are the ingredients you need.

Chocolate Peanut Butter Nut Cups
small candy cups
1 bag mini chocolate morsels
1 bag reeses peanut butter morsels
4 tablespoons vegetable oil
1 12 ounce can salted cocktail peanuts (I don't usually use the whole can)

Now let's get started!

 Place all your little candy cups on a cookie sheet.

Place all your ingredients except the nuts into a microwave safe bowl. 
Microwave for about 1min 30 secs or until all ingredients are melted.

Once everything is melted stir in your peanuts and then fill your candy cups.

YUM YUM!!!

And that's it!  Once they are done let them sit in the refrigerator to harden up.  I usually store my in the refrigerator as well.  These things are sooo yummy!!!

ENJOY!

Pin It

Saturday, December 15, 2012

Style Your Bookshelves Like A Pro

 source: house beautiful

Every home I visit the first thing a client wants me to do is restyle their bookshelves.  A well styled bookshelf filled with collectibles, books and family treasures adds warmth and interest to any room.  Use your bookshelves to display pretty vignettes of your favorite items.  Here are some examples of great bookshelf styling and some of the tips I follow whenever I am styling them myself.


COLOR THE BACK: It is always a plus when the back of the bookshelf has some color or texture.  Color and/or texture makes everything "pop".  If you are not ready to make the commitment to paint, cover a piece of foam board with your favorite fabric and place it in the back of the shelf.  No commitment there!  If you decide you don't like it, just take it down and recover the foam board with something else.

 Source: Martha Stewart 

Show off Your Collections:  Pull out the items that you love and put them on display.  Your shelves should be a reflection of you and your family.  In this photo a collection of pottery that feels like is has been collected over time is not symmetrical but yet still completely balanced. The varying heights of the object give visual interest while the similar colors bring everything together. Whether you collect birdcages or buttons, sculpture or shells, transferware or teacups, any collection you love deserves pride of place in your home. Plus, there's power in numbers: "Anything looks better as a collection," says Mary Carol. "The different sizes, shapes and colors play off each other, and grouping a collection together gives it emphasis." Gather up your treasures around the house and mass them for a stunning display.

 Source: HGTV

 Group Like Items: Create unity in your shelf displays by grouping items by theme, color, shape, texture or material.  Like items grouped together will give you the biggest bang.  The picture below is a perfect example.  Each shelf is linked together by either color, shape or texture.


Go Big A bookshelf filled with a plethora of smalls will look cluttered and distracting.  Instead use Big Bold accessories to mix in with your smaller items. If you think something is too big, trust me it's not.  Bold accessories stand out.

 Image Source: Style at Home


Mix Up The Height of Your Items:  A big no no is to line up a shelf with items that are all the same height.  This makes the items seem boring and unattractive.  Instead vary the height of the items in your shelf to keep the eye moving across it.  You can increase the height of an item just by placing it on a book.

 Image Source: Ikea.com

USE BOOKS: A said before, one way to increase the height of an item is to place it on a book.  Also when you place it on a book it seems to give it a bit of importance and bring some attention to it.  I also like to use books because they bring color and texture to the vignette.

 Image Source: Lonny

CREATE LAYERS IN YOUR SHELVES:  Consider depth when accessorizing your shelves.  Depth is the placement of items from front to back.  Use pictures trays and plates to stand up in you shelve to add depth to them.  Layer small shorter items in front of the larger items you have stand up in the back.  Consider the pieces in the back as a backdrop to the smaller item in the front.

 Image Source: DimplesandTangles


VARY YOUR BOOK DISPLAYS: Not all your books have to be standing up or laying flat.  Use them both ways.  This is a great way to increase the color and texture in your display as well as fill up empty space. "Display some books up and down and others laid on their side," says Nancy. "And group books by subject — mass all the photo books together, for instance — or by size, which instantly creates a sense of order." As for those tatty paperbacks, get rid of them or hide them in good-looking boxes or baskets tucked into your bookshelves. Design by Emily Henderson.

 Image Source: PorchlightInteriors


Pin It

Tuesday, December 11, 2012

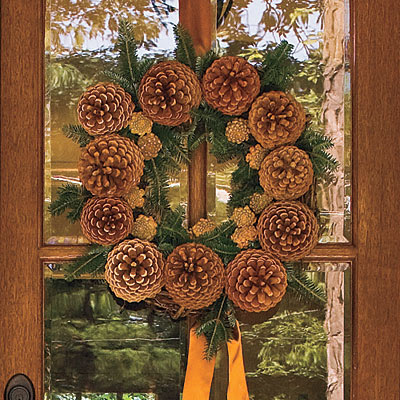
Natural Christmas Wreaths

I just love those Christmas Wreaths made with natural elements.  Here are some great examples, try your hand and making one yourself!

 Source: Southern Living
Large and small pine cones wired onto a grapevine wreath with christmas tree springs nestled in between.

 Source: Southern Living
The acorn wreath.  Acorns and nuts hot glued onto a wreath and finished off with magnolia leaves!


source: Etsy 
Boxwood Wreath.  Adorn your door with a natural boxwood wreath.  Save trimming from you box wood bushes and wire them on to a grapevine wreath.  Finish it of with pretty bow!

Pin It

Wednesday, December 5, 2012

Making Gift Baskets

Today I put together the cutest little gift basket for one of my favorite little girls, Sofi, who is turning 10!  Instead of just giving her a boring gift card, I found inexpensive items at Tuesday Morning, Walgreens, Hobby Lobby and the Dollar Store and created a Pink and Green Gift Basket for her birthday.


Gift Baskets are so fun and easy to make you just need to keep a few things in mind.  After you come up with a Theme for your basket, keep these few things in mind and you will have an awesome looking gift for someone!
  • One trick is to fill the bottom of the basket with packing peanuts or old newspaper. This will give the illusion of a fuller basket and make the gifts easier to see.
  • Over the 'peanuts', place a thick layer of basket filler. This can be colored shred or tissue paper. Overfill the basket as it will be weighted down as items are added.
  • Begin adding the biggest and tallest items toward the middle or back.
  • To hold some items in place, use tape to attach them to each other or to the container. The deep filling makes it easier to keep things still by "sinking" them in a bit.
  • Continue arranging gifts and then "fill out" the look of the basket. Make sure the paper or shred shows through. Fill in with more, if necessary. Add little items such as wrapped candies, silk flowers, Christmas ornaments, pine cones or whatever works with the theme. 
  • Finally you will need some cellophane to complete the basket.  I used shrink wrap that I have to say is soooooo fun to use.  Tape your shrink wrap around the basket, then get your hair dryer and watch the magic!  


Pin It